A water heater that doesn’t provide enough hot water is a sign of clogs and sediment build-up. This will require a plumber to drain and flush the tank or replace it if necessary.
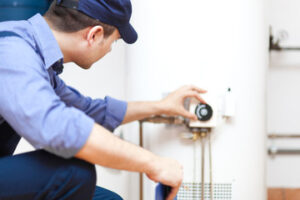
Licensed plumbers are trained to inspect and repair all aspects of your water heater, including the heating elements, anode rod, and gas lines. Keep reading the article below to Learn More.
No hot water is the first sign that something may be wrong with your water heater. Before you call in a professional, it is worth a quick check that the thermostat is not set too low. If this is the case, you can simply adjust it. It will take between 30 minutes and an hour for the water to reheat once you turn the switch back on, so give it some time before trying out your new setting.
If you still don’t have hot water, the next step is to look at your circuit breaker and make sure that it has not been tripped. After turning it back on, it will again take 30 to an hour for the water to reheat, so allow for this time before trying out your showers and sinks.
You can also check the temperature of the water coming out of your faucets to ensure that it is not too high. If it is, it can indicate that you have a problem with one of the heating elements in your electric water heater, or that there is a faulty thermocouple.
In addition to checking the thermostat, you can test each of the two heating elements in your electric water heater. You can do this by checking their voltage with a multimeter. If the upper or lower heating element is faulty, it will likely need to be replaced.
If the water heater is under warranty, you can contact the manufacturer to see about getting it repaired or replaced at no cost to you. You can also have a professional repair it, although this will likely cost more than just replacing the thermostat or other parts.
The most important thing to remember when repairing a gas water heater is to follow proper safety procedures, including shutting off the gas supply to the unit before starting any work. This is especially crucial if you are not familiar with how to disconnect the gas line safely. It is a good idea to consult with a plumber if you do not know how to safely disconnect the gas line from your water heater.
Pilot Light
The pilot light on a gas water heater is an essential component, but it can be dangerous if the flame goes out. If there’s a gas leak, the standing pilot flame could cause an explosion and eject deadly gas into your home.
If your pilot light is extinguished, the first thing you should do is turn off your gas. Then, find the pilot light and relight it. It should only take a few minutes, but you’ll want to make sure your hands are protected by gloves and safety glasses during the process.
Before you start, check to see if your circuit breaker is in the “On” position and that any fuses are not blown. Next, you should carefully open a panel that covers the pilot light area. You should then be able to see a little flame, which is typically located in a small copper tube. If you can’t see the flame, then you likely have a model that requires a long-handled match to be lit (look for the kind used to light barbecues). Locate the match or lighter and use it to light the pilot orifice.
Once the pilot light is relight, it’s important to hold down the ignitor button for one minute. This is because the pilot flame heats a thermocouple or thermopile. The device then produces a tiny electric current that tells the gas valve to stay open. The water heater also uses the thermocouple to regulate the temperature of your hot water.
If the thermocouple is dirty or not properly adjusted, it can produce an incorrect reading that causes the pilot light to go out. The good news is that it’s often a simple fix. You can usually clean the thermocouple by wiping it down with fine grit sandpaper.
A dirty pilot orifice can also be a problem, but it’s usually easier to diagnose and fix. The pilot orifice should be a strong blue color, not yellow or brown. If it’s not, this may be a sign that the pilot orifice is clogged with soot, rust, or dirt. If this is the case, it should be cleaned by a professional.
Dip Tube
A water heater’s dip tube is critical to its functioning. It’s a tube that transports cold water from the tank to the bottom of the unit where the burner is located. Without this, your water heater would produce very little hot water or none at all. Over time, the dip tube can deteriorate and degrade. It’s important to check the dip tube regularly for signs of deterioration so that you can replace it before it breaks down completely and causes a water heater malfunction.
The dip tube is made of a non-metallic material (usually cross-linked polyethylene PEX or CPVC) so that it doesn’t react with the steel tank and speed up its rusting. The dip tube also is made of a non-metallic substance so that it doesn’t interfere with the sacrificial anode, another component of your water heater that’s designed to eat away at rust and impurities inside the tank.
If the dip tube corrodes, it can let cold water escape to the top of the tank and mingle with your hot water supply. This impacts your supply of hot water as well as the quality and temperature of it. Cracks within the plastic also allow the water to seep through and contaminate your appliances, faucets and shower heads.
As the dip tube erodes it becomes shorter and shorter, allowing less cold water to reach the bottom of the water heater. Eventually, the dip tube will break off or sink into the bottom of the tank.
A new replacement dip tube is available at most hardware stores and online. You’ll need to purchase one that is the correct size for your water heater. The installation process is simple. Just locate the dip tube, remove the pipe nipple and the cold water pipe connector, pull out the old tube and insert the new one. Make sure the new tube is long enough to extend down to and below the water line at the bottom of your tank. When the dip tube is in place, you can replace the cold water pipe connector and nipple and restore power to your water heater and its circuit breaker.
Pressure Valve
The pressure valve is one of the most important safety features of a water heater. It allows water or gas to escape when the pressure rises too high, lowering the internal temperature and pressure. Without this mechanism, a tank would eventually burst. The resulting flood would cause major water damage, possibly even destroying the home or building. If a burst occurs, the emergency shut-off valve will immediately stop the flow of water and help mitigate the damage.
This valve can fail to function properly for a few reasons. Rust, corrosion, and mineral deposits can build up inside the valve or on its components, preventing it from opening. In addition, the valve may remain ‘frozen’ after releasing hot water during a previous pressure surge. This condition is known as’sticking’ and can be dangerous.
Regardless of the reason, it is important to check this critical component and ensure it is working as intended. Fortunately, it is relatively easy to inspect and repair a water pressure valve. First, make sure the gas supply to your water heater is turned off at the meter or main line, then turn the knob on the ‘Tank Valve’ to the ‘Off’ position.
Next, locate the valve on the top or side of the water heater and look at the opening. You should see a large tube that extends down to the floor, designed to release excess water or pressure. If you don’t see the tube, the valve is probably faulty and needs to be replaced.
It is also a good idea to inspect the water pressure valve on any other gas appliances in your home. This is especially true if you have an older model furnace with a pilot light. Older furnaces often have loose connections that can allow water or gas to leak into the house. Loose connections can usually be tightened by a homeowner, but some may require professional replacement. It’s a good idea to consult the manufacturer’s warranty paperwork to determine what type of maintenance is required to uphold the warranty benefits. In some cases, a simple once-per-year inspection is sufficient to maintain the benefits of the warranty.